Tutorial
1. EasyCwmp design
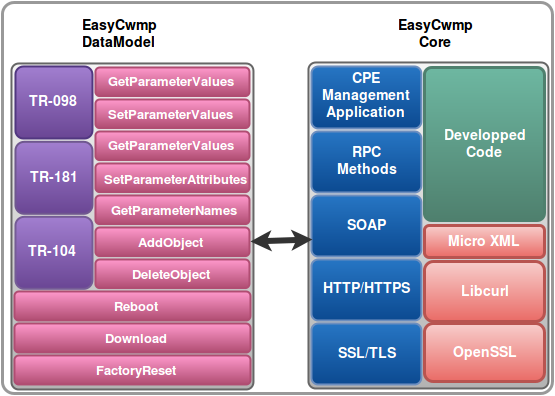
The EasyCwmp design includes 2 parts:
- EasyCwmp core: it includes the TR069 CWMP engine and it is in charge of communication with ACS server. It is developed with C.
- EasyCwmp DataModel: it includes the DATAModel of TR-06 and it is compliant to some DataModel standards such as TR-098, TR-181, TR-104, …
The key design goal is to separate the CWMP method execution from the CWMP engine. That makes easy to add and test new features.
DataModel is developped with shell as free solution and with C as commercial solution.
2. EasyCwmp dependencies
- libuci
- libcurl
- json-c
- ibubox: minimum version [git version: 0608d1299546d4af1facc271a090cb2abb8c6105, date: 2012-05-30]
- libubus: minimum version [git version: a62e2f8c15a65efb1a82404d8f31e3bfc1cbe7d9, date: 2012-06-01]
- microxml: microxml is a fork of Mini-XML, it’s being used to parse XML blocks passed between ACS and the client and it’s published by freecwmp guys:
- microxml source: git clone https://github.com/pivasoftware/microxml.git
- microxml OpenWRT package: wget https://easycwmp.org/download/libmicroxml.tar.gz
3. EasyCwmp install for OpenWRT Linux
EasyCwmp
EasyCwmp is mainly developed and tested with OpenWRT Linux platform.
Download
Download the easycwmp-openwrt-{x}.{y}.{z}.tar.gz and then copy it to your /path/to/openwrt/package/
cd /path/to/openwrt/package/
tar -xzvf easycwmp-openwrt-{x}.{y}.{z}.tar.gz
cd ..
tar -xzvf easycwmp-openwrt-{x}.{y}.{z}.tar.gz
cd ..
Build as built-in
make menuconfig #(And then select the package as )
make package/easycwmp/compile
make package/easycwmp/compile
Install:
- Build as built-in: install your OpenWRT system in your device according to the OpenWRT manuals and then start your system and you will get easycwmp running automaticall
- Build as package: copy the package to the OpenWRT system and then install it with:
opkg install
And then run it with:
/etc/init.d/easycwmpd start
or run it with:
/etc/init.d/easycwmpd boot
Note: If you run easycwmpd with start command then it will send inform to the ACS containing “2 PERIODIC” event and send GetRPCMethods to the ACS. And if you run easycwmpd with boot command then it will send inform to the ACS containing “1 BOOT” event.
Note: A third party application could trigger EasyCwmp daemon to send notify (inform with value change event) by calling the command:
ubus call tr069 notify
If the EasyCwmp daemon receive the ubus call notify then it will check if there is a value changed of parameters with notification not equal to 0
microxml
If you got any problem related to libmicroxml when building EasyCwmp in OpenWRT, then you can use the following libmicroxml package:
cd /path/to/openwrt/package/
wget
https://easycwmp.org/download/libmicroxml.tar.gz
https://easycwmp.org/download/libmicroxml.tar.gz
4. EasyCwmp install for other Linux distributions:
general
easycwmp will be placed in /opt/dev/ directory. All other dependencies will be installed in /opt/git/ directory.
Configure USER and GROUP variables that we are going to use:
UUSER=your_user
GROUP=your_group
GROUP=your_group
Create directories:
sudo mkdir -p /opt/{dev,git}
sudo chown -R $USER:$GROUP /opt/{dev,git}
sudo chown -R $USER:$GROUP /opt/{dev,git}
curl
Your distribution should already have curl development package. Use that for now.
Note: If you build libcurl with an SSL package dependency, it is recommended to build with OpenSSL since EasyCwmp was mainly tested with libcurl using OpenSSL.
The digest authentication with ACS server will not work if you build libcurl with PolarSSL.
json-c
git clone git://github.com/json-c/json-c.git
/opt/git/json-c
cd /opt/git/json-c/
mkdir build
cd build
cd /opt/git/json-c/
mkdir build
cd build
Configure:
cmake ../CMakeLists.txt
../cmake-configure –prefix=/usr
../cmake-configure –prefix=/usr
Install:
sudo make install
sudo ln -sf /usr/include/json-c /usr/include/json
sudo ln -sf /usr/include/json-c /usr/include/json
libubox
Get the sources:
git clone git://nbd.name/luci2/libubox.git /opt/git/libubox
cd /opt/git/libubox/
cd /opt/git/libubox/
Configure:
cmake CMakeLists.txt -DBUILD_LUA=OFF
Build:
make
Install:
sudo make install
sudo ln -sf /usr/local/lib/libubox.so /usr/lib/libubox.so
sudo mkdir -p /usr/share/libubox
sudo ln -sf /usr/local/share/libubox/jshn.sh /usr/share/libubox/jshn.sh
sudo ln -sf /usr/local/lib/libubox.so /usr/lib/libubox.so
sudo mkdir -p /usr/share/libubox
sudo ln -sf /usr/local/share/libubox/jshn.sh /usr/share/libubox/jshn.sh
uci
Get the sources:
git clone git://nbd.name/uci.git /opt/git/uci
cd /opt/git/uci/
cd /opt/git/uci/
Configure:
cmake CMakeLists.txt -DBUILD_LUA=OFF
Build:
make
Install:
class=”western”
sudo make install
sudo ln -sf /usr/local/bin/uci /sbin/uci
sudo ln -sf /usr/local/lib/libuci.so /usr/lib/libuci.so
sudo make install
sudo ln -sf /usr/local/bin/uci /sbin/uci
sudo ln -sf /usr/local/lib/libuci.so /usr/lib/libuci.so
ubus
Get the sources:
git clone git://nbd.name/luci2/ubus.git /opt/git/ubus
cd /opt/git/ubus/
cd /opt/git/ubus/
Configure:
cmake CMakeLists.txt -DBUILD_LUA=OFF
Build:
make
Install:
sudo make install
sudo ln -sf /usr/local/sbin/ubusd /usr/sbin/ubusd
sudo ln -sf /usr/local/lib/libubus.so /usr/lib/libubus.so
sudo ln -sf /usr/local/sbin/ubusd /usr/sbin/ubusd
sudo ln -sf /usr/local/lib/libubus.so /usr/lib/libubus.so
microxml
Get the sources:
git clone https://github.com/pivasoftware/microxml.git /opt/git/microxml
cd /opt/git/microxml/
cd /opt/git/microxml/
Generate configuration files:
git clone https://github.com/pivasoftware/microxml.git /opt/git/microxml
cd /opt/git/microxml/
cd /opt/git/microxml/
Configure:
./configure –prefix=/usr –enable-threads –enable-shared –enable-static
Build:
make
Install:
sudo make install
sudo ln -sf /usr/lib/libmicroxml.so.1.0 /lib/libmicroxml.so
sudo ln -sf /usr/lib/libmicroxml.so.1.0 /lib/libmicroxml.so.1
sudo ln -sf /usr/lib/libmicroxml.so.1.0 /lib/libmicroxml.so
sudo ln -sf /usr/lib/libmicroxml.so.1.0 /lib/libmicroxml.so.1
easycwmp
compiling:
Once the dependencies have been installed we can start compiling easycwmp.
Get the sources:
Download the easycwmp-{x}.{y}.{z}.tar.gz under /opt/dev/
cd /opt/dev/
tar -xzvf easycwmp-{x}.{y}.{z}.tar.gz
mv easycwmp-{x}.{y}.{z} easycwmp
cd /opt/dev/easycwmp/
tar -xzvf easycwmp-{x}.{y}.{z}.tar.gz
mv easycwmp-{x}.{y}.{z} easycwmp
cd /opt/dev/easycwmp/
Generate configuration files:
autoreconf -i
Configure:
./configure –enable-debug –enable-devel –enable-acs=multi –enable-jsonc=1
Build:
make
configuration
We won’t install easycwmp, we’ll use it from /opt/dev/easycwmp/ directory. Make sure we are located there:
cd /opt/dev/easycwmp/
Because we are using this setup for development we want that all our changes are visible in our git clone. Best way to do this is to use symlinks. First create the directory where scripts are located on actual device:
sudo mkdir -p /usr/share/easycwmp/functions
sudo mkdir -p /etc/easycwmp
Then create symlinks for easycwmp scripts:
sudo ln -sf /opt/dev/easycwmp/ext/openwrt/scripts/easycwmp.sh /usr/sbin/easycwmp
sudo ln -sf /opt/dev/easycwmp/ext/openwrt/scripts/defaults /usr/share/easycwmp/defaults
sudo ln -sf /opt/dev/easycwmp/ext/openwrt/scripts/functions/common/common /usr/share/easycwmp/functions/common
sudo ln -sf /opt/dev/easycwmp/ext/openwrt/scripts/functions/common/device_info /usr/share/easycwmp/functions/device_info
sudo ln -sf /opt/dev/easycwmp/ext/openwrt/scripts/functions/common/management_server /usr/share/easycwmp/functions/management_server
sudo ln -sf /opt/dev/easycwmp/ext/openwrt/scripts/functions/common/ipping_launch /usr/share/easycwmp/functions/ipping_launch
sudo ln -sf /opt/dev/easycwmp/ext/openwrt/scripts/functions/tr181/root /usr/share/easycwmp/functions/root
sudo ln -sf /opt/dev/easycwmp/ext/openwrt/scripts/functions/tr181/ip /usr/share/easycwmp/functions/ip
sudo ln -sf /opt/dev/easycwmp/ext/openwrt/scripts/functions/tr181/ipping_diagnostic /usr/share/easycwmp/functions/ipping_diagnostic
then
chmod +x /opt/dev/easycwmp/ext/openwrt/scripts/functions/*
Also, you can create symlink for easycwmp configuration file:
sudo mkdir /etc/config
sudo ln -sf
/opt/dev/easycwmp/ext/openwrt/config/easycwmp /etc/config/easycwmp
/opt/dev/easycwmp/ext/openwrt/config/easycwmp /etc/config/easycwmp
And finally create symlink for easycwmpd binary:
sudo ln -sf /opt/dev/easycwmp/bin/easycwmpd /usr/sbin/easycwmpd
We need to export few variables that are used in easycwmp scripts:
export UCI_CONFIG_DIR=”/opt/dev/easycwmp/ext/openwrt/config/”
export UBUS_SOCKET=”/var/run/ubus.sock”
export UBUS_SOCKET=”/var/run/ubus.sock”
Install few shell scripts from OpenWrt:
sudo mkdir -p /lib/{config,functions}
sudo wget http://pastebin.lukaperkov.net/openwrt/20121219_lib_functions.sh -O /lib/functions.sh
sudo wget http://pastebin.lukaperkov.net/openwrt/20121219_lib_config_uci.sh -O /lib/config/uci.sh
sudo wget http://pastebin.lukaperkov.net/openwrt/20121219_lib_functions_network.sh -O /lib/functions/network.sh
If everything is configured properly when you run:
bash /usr/sbin/easycwmp -–json get value Device.
You should see some output like this:
{ “parameter”: “Device.DeviceInfo.Manufacturer”, “fault_code”: “”, “value”: “easycwmp”, “type”: “xsd:string” }
{ “parameter”: “Device.DeviceInfo.ManufacturerOUI”, “fault_code”: “”, “value”: “FFFFFF”, “type”: “xsd:string” }
{ “parameter”: “Device.DeviceInfo.ProductClass”, “fault_code”: “”, “value”: “easycwmp”, “type”: “xsd:string” }
{ “parameter”: “Device.DeviceInfo.SerialNumber”, “fault_code”: “”, “value”: “FFFFFF123456”, “type”: “xsd:string” }
{ “parameter”: “Device.DeviceInfo.HardwareVersion”, “fault_code”: “”, “value”: “example_hw_version”, “type”: “xsd:string” }
{ “parameter”: “Device.DeviceInfo.SoftwareVersion”, “fault_code”: “”, “value”: “example_sw_version”, “type”: “xsd:string” }
{ “parameter”: “Device.DeviceInfo.UpTime”, “fault_code”: “”, “value”: “429120”, “type”: “xsd:string” }
…
…
Depending on your system you might need to:
export PATH=$PATH:/usr/sbin:/sbin
sudo ln -sf bash /bin/sh
sudo ln -sf bash /bin/sh
Please note that your system /bin/sh symbolic link should be pointed to the bash interpretor.
Make changes in /etc/config/easycwmp and in /usr/share/easycwmp/defaults so easycwmpd can connect to your ACS server. But before you run easycwmpd make sure that you have in another terminal running ubusd:
/usr/sbin/ubusd -s /var/run/ubus.sock
Finally run easycwmpd as root:
/usr/sbin/easycwmpd -f -b
Note: A third party application could trigger EasyCwmp daemon to send notify (inform with value change event) by calling the command:
ubus call tr069 notify
If the EasyCwmp daemon receive the ubus call notify then it will check if there is a value changed of parameters with notification not equal to 0
References